How Do You Make A Homemade Basketball Hoop
How do you make a homemade basketball hoop - The artwork of embroidery started hundreds of years ago. Early examples might be discovered all around the world. There is historic embroidery from Egypt, Northern Europe and China. The place and how it truly started will remain a mystery. What we do know is that in Europe, embroidery was a status symbol. Using a needle and thread in an effort to sew patterns on fabric was an indication of wealth and prosperity. It was thought of a lady's work. Many royal and noble ladies spent hours embroidering. They embroidered every little thing, from tapestries to coats. These rich and highly effective ladies had been often depicted in portraits with their embroidery body or different tools used for the craft. Many other cultures share Europe's use of embroidery as marking wealth and status. Persia, India, Japan and China also have richly embroidered fabrics. These were celebrated cloth and those who made them have been artisans of excessive caliber.
There are two primary methods to save lots of a stabilizer. The primary is through pre-planning, hooping your stabilizer slightly in another way than traditional, and the second is using leftover scraps of stabilizer after it has been used for embroidery. How you narrow and hoop your stabilizer can lengthen the number of embroideries you possibly can sew out, saving you cash. When slicing your authentic piece of both cut away or tear away to position in your hoop, lower it the dimensions you need in one dimension, both size or width, but for much longer within the other dimension. For instance, if you are slicing an 8-inch vast piece for a 4x4 hoop, you may cut the stabilizer 8" x 24". Embroider the first design at one end. After neatly reducing or tearing the stabilizer away from the finished design, re-hoop on the similar finish for your subsequent design, beginning simply previous the torn part. You may must press the stabilizer using a dry iron on low temperature in between hoopings if it is wrinkled. Now you may reuse more of the stabilizer, probably being able to stitch out four (4) embroideries, depending on their size, from the one piece, as an alternative of the three (3) embroideries you'll get by cutting three items 8"x8". Take this concept to the acute, and do not lower your size off in any respect. Hoop your stabilizer, leaving the roll attached towards the top of the ring. Place the roll behind the machine, out of the way of the ring, embroidery arm, or any threads. After the embroidery is full, tear the stabilizer away, press the wrinkles out, and hoop again at the forefront.
Cut two pieces of rods and then use them to secure the folded flat metal to the hoop. You can attach the hook which you bent up earlier to lower back side of the backboard.
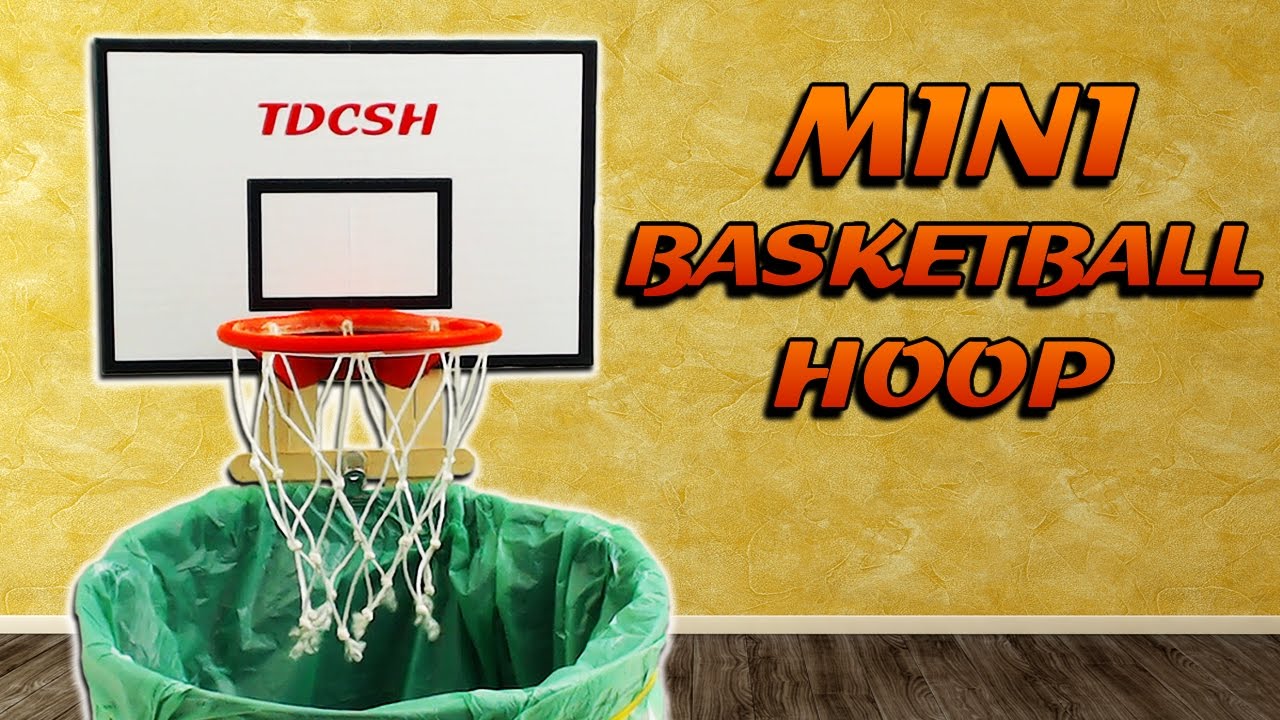
Mini Basketball Hoop Office Toy Youtube Basketball Hoop Mini Basketball Hoop Mini Basketballs
Today we show you how to make an original Mini Basketball Hoop an office toy to Relieve Stress.

How do you make a homemade basketball hoop. Fulfills the dual purp. It was fairly cheap to make. Score the strip into 3 7-inch segments so you can fold it into a rectangular.
Once the hole is dug place the 6 x 6 in it and brace it with your 4 2 x 4s and a few screws. To make your own cardboard basketball hoop start by cutting a 7 inch by 23 inch strip of corrugated cardboard. Basketball hoops sit exactly 10 feet off the ground.
Allow another 3 to 4 feet on the wall so the top of the backboard can sit firm against the wall. Shout out to Mission hand. Get a flat metal with about 4 mm of thickness and fold it in a 90-degree angle.
Make sure the rim is as close to the backboard as possible. Next dig a hole for the 6 x 6 post. Let Everyone Know Where Your Allegiance Lies.
Get Your Favorite Teams Gear Here. You need to make sure the wall rises to at least 15 feet from the ground unless you are planning on lowering the hoop for young children. Youll need a wire hanger a large piece of cardboard tape marker.
First measure out where you want the basketball goal to be located. Made entirely from recycled materials. Attach a net to the basketball rim optional.
Wed suggest digging it 12 inches wide and 2 feet deep. This will help you get used to making shots while being defended get better with making passes and be a good team playerStep 3 Make your practice session as game-like as possible if youre training by yourself. Now drill about 4 holes to the folded piece of metal.
If you want to shoot some hoops in your room you can make your own inside basketball hoop using a few basic supplies. Tape the hoop to the backboard. Mix the concrete and pour it.
Weld the hoop you made to the flat metal. For Project Discover I designed and made a Basketball Hoop from scratch. Comment questions down below.

How To Draw A Basketball Hoop Step Drawing Tutorial With Pictures Cool2bkids Basketball Drawings Sports Drawings Basketball Painting

Basketball Hoop Diy Basketball Hoop Basketball Backboard Pool Basketball

Pin On Homemade Basketball Hoop
Mini Basketball Hoop Oyuncak Faaliyetler Okul Oncesi

12 Unusual Ways To Reinvent Old Sports Gear Basketball Bedroom Diy Projects Man Cave Basketball Room

101 Uses Of Polycarbonate 7 Basketball Backboard

How To Make An Inside Basketball Hoop For Your Room Basketball Hoop Basketball Indoor

How To Build A Basketball Hoop For Cheap Part 5 Youtube Basketball Hoop Diy Basketball Hoop Diy Basketball Hoop

Recycled Basketball Hoop Kids Room Recycling Make A Wish

Wall Basketball Hoop Diy From Pallet Wood Wood Pallet Projects Wood Pallets Pallet Diy

Indoor Basketball Hoop Diy Boys Room Diy Basketball Hoop In Bedroom Diy Basketball Hoop

Pin On Diy

How To Make A Homemade Cardboard Basketball Hoop Easy Basketball Hoop Diy Basketball Hoop Basketball Hoop Diy Basketball

Pin On Knot Projects
I would like to present you some suggestions for hooping satin jackets for machine embroidery. We don't need topping for satin jackets as a result of it is a secure material, unlike sport shirts and t-shirts that are knits and stretchy. Hooping satin jackets is one of the trickiest little jobs for the new embroiderer to grasp. The design placement on the jacket again should be good - not too low or excessive - and it should be straight. For placement, one rule of thumb is to put the bottom of the lettering (if using an arc, measure for the letter at the high of the arc) seven inches down from the collar seam. One other is to place the design's heart at approximately 9 or 10 inches down from the collar seam. (That is just a guideline. If that you must, get a sewout of the design or photocopy the precise measurement and lay it on the jacket to determine one of the best placement.) To get the design straight, lay the jacket flat and smooth, and utilizing clothespins, connect a yardstick below each sleeve where the seams come together. Draw a line with tailor's chalk or cleaning soap for the horizontal placement. Make a midway mark on this line to show the center. Be sure you double-check these measurements with your eye - jacket making shouldn't be an exact science and generally you need to adjust one way or another to make up for discrepancies in measurements.
Janome designed the Memory Craft 9700 to convey together all the most effective features into one stitching machine. The MC9700 has the power and precision of a superior stitch mechanism combined with the sophistication of computerized control. You get the precision stitching Janome is known for along with easy navigation and design structure on a colour contact screen. The Reminiscence craft 9700 can convert from a sewing machine into an embroidery machine in seconds. In contrast to other brands that require separate attachments and numerous steps the 9700 has a built-in, two-step conversion. Just contact the embroidery mode key then attach the embroidery foot and one minute it's a stitching and quilting machine the next an embroidery machine.
Deanne Blackhurst is a freelance author for Dee's Crimson Works, an online web site that makes a speciality of Redwork and Cross Stitch patterns. Using the standard redwork style as inspiration, these new patterns are reasonably priced and have a enjoyable classic feel however with a recent perspective. At Dee's Purple Works you can find traditional units that feature the Days of the Week and charming Sun Bonnet Ladies in addition to the more current Cheese and Wine assortment and Celtic Knots. They also carry thread and notions particularly designed for redwork and cross sew. Go to them at Dee's Crimson Work Inc [http://www.dsredwork.com] and find a sample you can't resist.


Comments
Post a Comment